How to Get a Still Image from a Video: The Complete Multi Platform Guide
Pulling a high resolution still image from a video is a highly practical skill for content creators, designers, and curators. While the initial instinct for most people is to simply hit the screen capture button, doing so almost always degrades the visual quality. Standard screenshots compress the colors and scale the image down to your monitor's display resolution, leaving you with blurry details.
During our hands on testing with various operating systems and video formats, we compiled the most reliable methods to extract uncompressed, pixel perfect frames. Here is how to get a still image from a video across PC, macOS, iPhone, Android, YouTube, CapCut, and Canva without compromising your source file quality.

Section 1: The Screen Grab Quality Bottleneck
Why not just take a quick screenshot? When you perform a native screen capture, your device only captures the pixels currently rendered on your screen (which is heavily limited by your monitor or phone's physical display resolution). For instance, taking a screenshot of a 4K video on a standard 1080p phone display compresses the image, dropping its resolution from roughly 8.3 megapixels down to just 2 megapixels.
To pull an image that preserves the raw sensor data, dynamic color range, and fine textures, you need a true file extraction method. This process pulls the original source frame directly from the video stream, ensuring zero compression and zero quality loss.
Section 2: Desktop Methods (Windows and macOS)
For local files, desktop systems have highly reliable built in media players that can pull raw frames with a few clicks.
Windows Native Methods
Depending on your Windows version, the built in Photos app offers a direct frame extraction tool.
-
For Windows 11 Users (Photos App):
- Right click your video file and select "Open with" followed by "Photos".
- Play the video and pause it exactly on the frame you want to capture.
- Click the three dots (...) located on the right side of the playback timeline.
- Select "Save a frame". This will instantly export the uncompressed still directly into the same folder as your original video, making file organization highly convenient.
-
For Windows 10 Users (Legacy Photos App):
- Open your video with the default "Photos" app.
- Pause the video at your desired frame.
- Click the pencil icon (Edit & more) in the player control bar.
- Select "Save a photo from video" (or "Save a frame"). Drag the blue marker to fine tune the exact millisecond, and click "Save a photo".
-
The Quick Screenshot Alternative (All Windows Versions): If you just need a fast preview and do not mind standard screen resolution, pause your video in Media Player and press Windows Key + Shift + S to open the Snipping Tool. Drag a selection box over the video player and save the image directly from your clipboard interface.
macOS Native Methods
Apple users have several highly efficient ways to extract video frames, depending on the software they prefer to use.
- The QuickTime Player Clipboard Method (Fastest):
- Open your video file inside Apple "QuickTime Player".
- Use the arrow keys on your keyboard to navigate to the exact frame you want.
- Press Command + C on your keyboard (you will hear a camera click sound indicating the frame is successfully copied to your clipboard).
- Open the built in "Preview" app and press Command + N (New from Clipboard) to generate the image. Go to "File" followed by "Save" to export it.
- Alternatively, you can paste the frame directly using Command + V into apps like Notes, Pages, or Messages.
-
The Apple Photos App Method (Best for Photo Library Quality):
- Import your target video into your Apple "Photos" library.
- Double click to play the video, and drag the playhead to the frame you want to export.
- Click "File" at the top of your screen, choose "Export", and select "Export Frame to Pictures".
- The image will automatically save as a high quality, uncompressed TIFF file in your local "Pictures" folder.
-
The iMovie Method (Best for Video Editors):
- If you are already editing inside Apple "iMovie", align your playhead over the target frame.
- Click the share icon in the top right, or click "File" followed by "Share" and "Image".
- Select your save directory to export the frame as a high quality JPEG.
For Ultimate Precision: VLC Media Player (PC & Mac)
If you need frame accuracy to get still images from video files, VLC Media Player remains the industry standard.
- Open your video inside the free VLC media player.
- Pause the video near the moment you want to capture.
- Press the "E" key on your keyboard. In our tests, this advanced hotkey was the easiest way to advance the video frame by frame, letting us lock onto the exact millisecond of action.
- To capture the frame, press "Shift + S" on Windows (use "Option + Command + S" on Mac). Alternatively, you can right click the video player and select "Take Snapshot", or navigate to the top menu and select "Video" followed by "Take Snapshot". The lossless frame will save instantly to your default "Pictures" folder.
-
How to Customise VLC Snapshot Settings (Change Folder & Format): By default, VLC saves snapshots as PNG files in your local Pictures folder. To change this, go to "Tools" followed by "Preferences" on Windows (or select "VLC" and "Preferences" on Mac). Click the "Video" tab, look for the "Video snapshots" section, and click "Browse" to set a custom destination (such as your Desktop). In this section, you can also change the file format to JPG, PNG, or TIFF before clicking "Save".
-
Pro Tip for Bulk Extraction (VLC Scene Filter): If you need to automatically convert an entire video into a sequence of images without extracting frames manually, you can use the advanced VLC Scene Filter. Under the advanced preferences menu, you can navigate to the video filters section and enable the "Scene video filter". This tool allows you to set a custom directory and define exact frame intervals (such as extracting a frame automatically every 10 frames), saving you hours of manual screenshotting.
Section 3: How to Get an Image from a Video on iPhone and Android
Mobile platforms handle video extraction differently, especially when preserving metadata and HDR coloring.
Extracting Still Images on iPhone (iOS)
If you are wondering how to get still image from video iphone users often struggle because the native iOS Photos app does not feature an "Export Frame" button for standard videos. In our testing, we found two reliable ways around this restriction:
- The Best Quality Method (Dedicated Apps): To bypass native iOS screenshot resolution limits, download a free or freemium app such as "Frame Grabber" or "HashPhotos" from the App Store. Open your video inside the app, scrub frame by frame, and export the file as a lossless PNG or high quality HEIC directly to your gallery. "HashPhotos", specifically, is an excellent photo manager that includes a dedicated frame extraction utility, making it the optimal way to master how to get image from video iphone displays without downscaling.
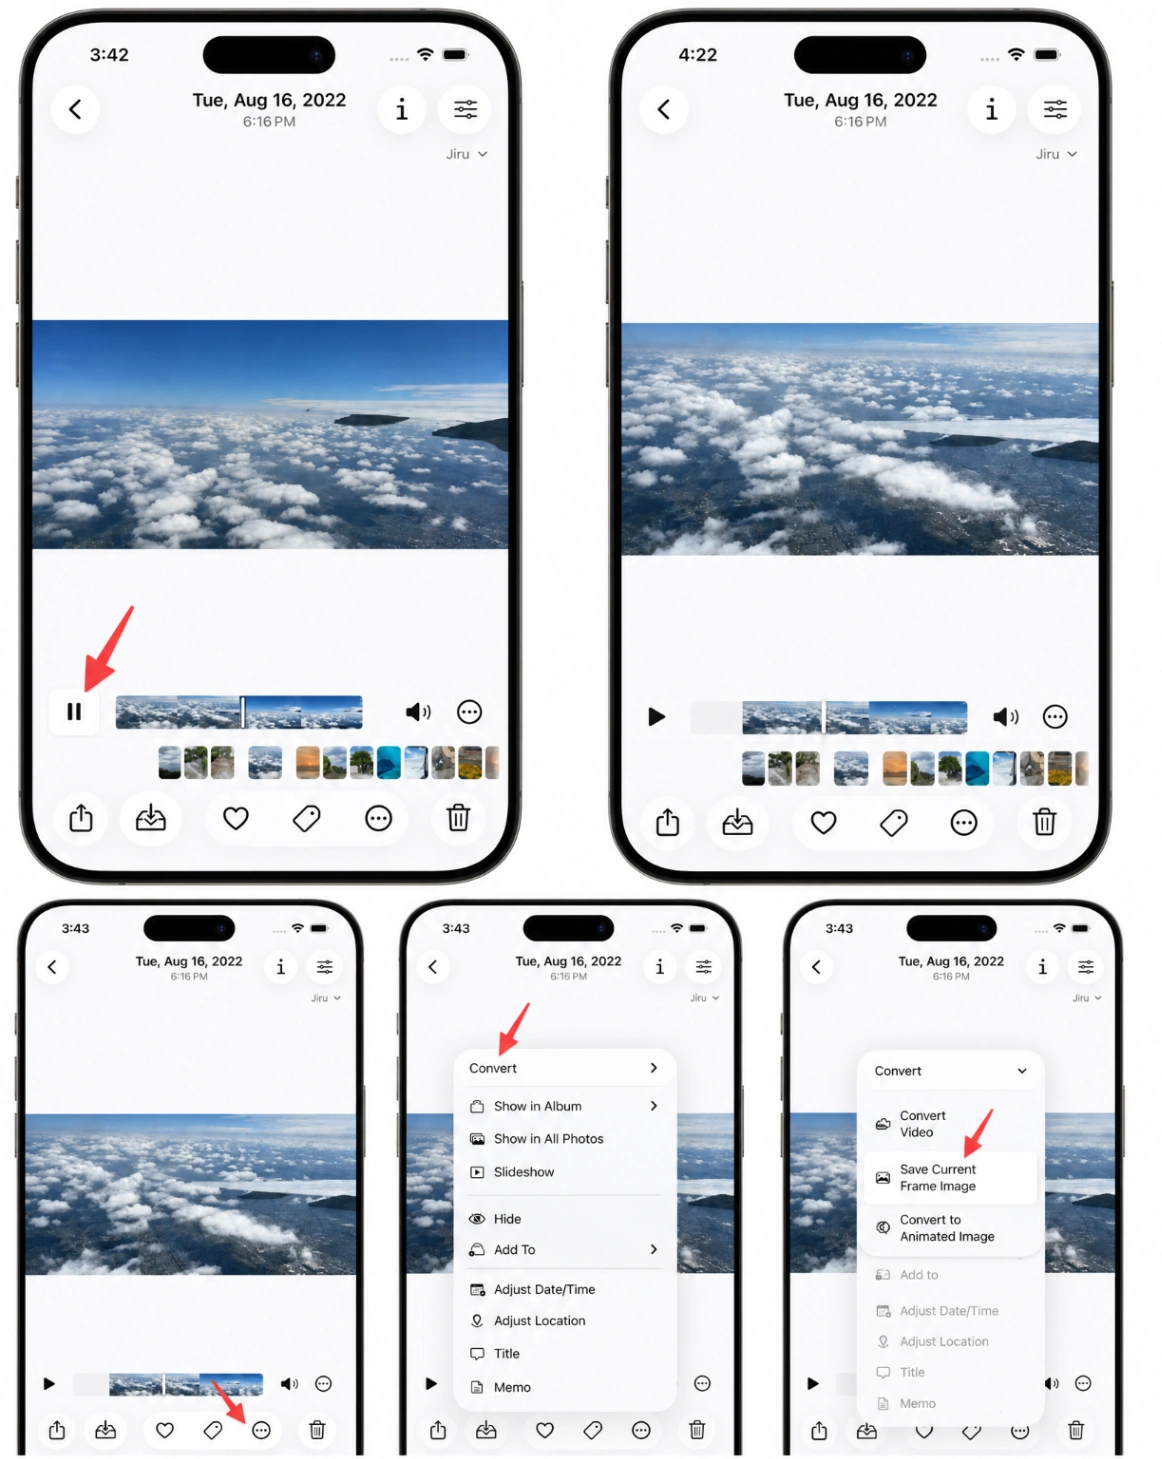
- The Live Photo High Resolution Secret: If you are extracting from a Live Photo rather than a standard video, you do not need third party apps. A Live Photo actually consists of a high resolution "Key Photo" and a lower resolution video file. Open the Live Photo, tap "Edit", select the frame icon, and choose "Make Key Photo". This saves the chosen frame at the camera's full megapixel resolution rather than the video's lower resolution.
- The Quick Screenshot Method (Easiest but Lower Quality): Open your video in the iOS "Photos" app, pause at the desired frame, and tap the screen once to hide all overlay controls and timeline scrubbers. On modern iPhones (with Face ID), press the Side button and the Volume Up button simultaneously to take a screenshot. On older models with a physical Home button, press the Side button and the Home button instead. Tap the screenshot thumbnail that appears in the bottom left corner, use the built in crop tool to trim out any remaining black bars, and tap "Done" followed by "Save to Photos". This completes the steps for how to get an image from a video on iphone.
Extracting Still Images on Android
Because Android uses different custom operating system skins, the exact steps to solve how to get image from video depend on your phone's brand.
-
Using Google Photos (Pixel, Motorola, Xiaomi, and OnePlus):
- Open the "Google Photos" app and select your video.
- Tap the "Edit" button (represented by a slider icon) at the bottom of the screen.
- Move the white timeline slider until you find the exact frame you want.
- Tap the "Export frame" option (which appears as a bent arrow inside a square box icon, or a direct button just above the timeline).
- The app will save a pristine, full resolution copy of that single frame directly to your photo library.

-
Using Samsung Gallery (Samsung Devices): If you own a Samsung Galaxy device, the native Gallery app features a dedicated, lossless snapshot tool:
- Open your "Gallery" app and select your video.
- Tap "Play video" to open the native player.
- Pause the video exactly on the frame you want to extract.
- Tap the Capture icon (a small screen capture or camera symbol located in the top left corner of the video player screen).
- The frame will instantly save as a high quality photo directly to your "Video captures" album in the Gallery.
-
The Quick Fallback (All Devices): If your native gallery lacks these tools, pause the video at the desired frame, tap once to hide overlay controls, and take a screenshot by pressing Volume Down and the Power button simultaneously.
Section 4: How to Get an Image from a Video on YouTube
Extracting visuals from streaming platforms requires specific techniques, particularly if you want to know how to get thumbnail image from youtube video or simply save a preview for reference.
The Browser Double Right Click Shortcut (Chrome, Edge, and Brave)
Many users do not realize that modern Chromium browsers can bypass YouTube's custom player overlay to extract native frames directly.
- Crucial Step: Before capturing, click the gear icon (Settings) in the bottom right corner of the YouTube player and force the video resolution to its maximum available option (such as 1080p, 1440p, or 4K/2160p). Capturing a frame while YouTube is running on auto-resolution (like 480p) will result in a heavily pixelated capture.
- Pause the video on the exact, high resolution frame you want to extract.
- Right click once on the video player (this opens YouTube's native player menu).
- Without moving your mouse, right click a second time (this reveals the browser's hidden context menu).
- Select "Save video frame as..." to save the frame as a PNG, or choose "Copy video frame" to paste it directly into an image editor. This is the cleanest way to solve how to get an image from a youtube video and how to get image from youtube video layouts.
The Browser Extension Method (Best for Frequent Captures)
If you are a professional curator who frequently needs to pull dozens of images from web video platforms, browser extensions can save a massive amount of time.
You can download a dedicated free extension like "Screenshot YouTube" from the Chrome Web Store. Once active, the extension injects a dedicated "Screenshot" camera icon directly onto your YouTube player control bar. Simply pause, click the camera icon once, and your browser will instantly download the raw frame in full resolution without needing to double right click.
How to Get Preview Image from YouTube Video Using URLs
If you need to retrieve the official thumbnail image from a YouTube video, you do not even need to play the video. YouTube stores every thumbnail on its servers, and you can access it by modifying a simple web address.
Every YouTube video has a unique ID (the letters and numbers following "v=" in the web address). Copy that ID and paste it into the following template:
https://img.youtube.com/vi/[VIDEO_ID]/maxresdefault.jpg
This URL will immediately load the highest resolution preview image of the video, which you can easily right click and save to your device, answering both how to get preview image from youtube video and how to get thumbnail image from youtube video requests.
Section 5: Extracting Stills from Creative Tools (CapCut & Canva)
Modern creators often need to extract stills while in the middle of editing workflows.
How to Get Image from Video CapCut
CapCut has quickly become one of the most popular video editing applications on both mobile and desktop.
-
On CapCut Mobile (iOS and Android Native Tool): If you simply want to extract a high resolution frame from a raw video on your phone, CapCut has an incredibly useful built in tool on its home screen.
- Open the CapCut app. Instead of starting a new project, scroll down to the "Popular Tools" section on the home screen and tap "All Tools".
- Under the "Quick Actions" section, tap the "Frame Capture" utility.
- Select your target video from your device library and tap "Next".
- Move the playhead slider to the exact frame you want to extract, and tap "Capture" followed by "Export" to save the clean, full resolution still image directly to your phone.
- (Alternative timeline method) If you are actively editing a video project and want to freeze a frame inside your timeline, highlight your video clip on the timeline, scroll to your desired point, and tap the "Freeze" tool in the bottom menu. This splits the clip and inserts a still image directly onto your edit track.
-
On CapCut Desktop (PC & Mac):
- Import your video into CapCut Desktop and drop it onto your editing timeline.
- Move your playhead to the exact frame you want to capture.
- Look at your video preview player. In the top right corner of the player window, click the Menu icon (represented by three horizontal lines).
- Select "Export Still Frame".
- In the settings pop up, you can adjust your resolution (matching your project timeline setting) and choose your file format (JPEG or PNG). Click "Export" to save the uncompressed frame directly to your computer.
How to Get Still Image from Video in Canva
If you are designing templates or social media assets, Canva allows you to turn a video segment into an image. However, doing so requires understanding a crucial, hidden mechanism within Canva's software architecture.
- The Crucial Technical Detail (The First Frame Rule): Canva's video timeline is organized in pages. When you download a page containing a video as a PNG or JPEG, Canva's rendering engine always exports the very first frame of that page. If you do not split your timeline, your exported image will always be the absolute beginning frame of your video file, rather than the frame you paused on.
- Drag and drop your video file into your Canva design space.
- Play or scrub the video timeline to locate the exact frame you want to capture.
- Right click directly on the timeline indicator where you paused, and select "Split video" (or press the "S" key on your keyboard). This cuts the video into two separate pages precisely at that frame.
- Because of this split, your desired frame is now mathematically isolated as the very first frame of the second page.
- Click "Share" in the top right corner and select "Download".
- Set the file format to PNG or JPEG.
- In the select pages dropdown, uncheck all other pages and select only the second page (which holds your newly isolated frame). Click "Download" to save your high quality, perfect still.
Section 6: Advanced Technical Extraction (FFmpeg)
For developers, systems administrators, or professionals processing large volumes of footage, command line interfaces offer the absolute highest accuracy. FFmpeg is an open source command line utility that handles raw media processing seamlessly without needing to open a heavy graphic user interface.
1. Extracting a Single Precise Frame (Fast Seeking)
To capture a single, high quality frame from a specific timestamp, we recommend placing the seeking parameter before the input file parameter in your terminal.
ffmpeg -ss 00:01:30 -i input.mp4 -frames:v 1 output.png
- The Technical Mechanics:
-ss 00:01:30: Tells FFmpeg to seek to 1 minute and 30 seconds. Placing this argument before-itriggers Input Seeking, which quickly skips through the video container indexes. This is dozens of times faster than placing it after the input file, which causes slow, active decoding of the early video frames. You can also specify plain seconds, such as-ss 90.-i input.mp4: Defines your target input video file.-frames:v 1: Commands the parser to output exactly one video frame.output.png: The destination file name. We highly recommend using.pngto preserve a raw, lossless image, though you can use.jpgif you want a lighter, compressed file size.
2. Extracting Frames at Constant Time Intervals
If you need to batch process a security file or convert a lengthy clip into sequential images, you can utilize the fps video filter parameter.
- To extract one frame every single second:
ffmpeg -i input.mp4 -vf fps=1 output_%04d.png - To extract one frame every minute:
ffmpeg -i input.mp4 -vf fps=1/60 output_%04d.png - To extract one frame every 5 seconds:
ffmpeg -i input.mp4 -vf fps=1/5 output_%04d.png - The Directory Variable:
output_%04d.pngtells FFmpeg to export files with sequential, four-digit numbers (creating files namedoutput_0001.png,output_0002.png, and so on).
3. Technical Tweaks for Quality and Scaling
- Force Maximum Quality for JPEGs: If you must use JPEGs instead of lossless PNGs, the default compression can create heavy pixelation. Add the
-qscale:v 2(or-q:v 2) flag to force FFmpeg to render the JPEG at maximum quality. Lower numbers represent higher quality, where 2 is pristine. - Resize Stills Automatically: You can chain a scaling filter to your extraction command. For example, adding
-vf "scale=1280:-1"will automatically scale the extracted frame's width to 1280 pixels, while using-1instructs the parser to dynamically adapt the height to preserve the video's original aspect ratio.
Section 7: Pro Tips for Capturing High Quality Stills
Even the best software cannot extract a sharp image from poor source footage. To bridge the gap between basic video grabs and professional level photography, apply these advanced production rules:
1. Optimize Your Camera Settings Before Filming
If your primary goal during a shoot is to extract high quality stills, you must change how you configure your camera settings:
- Maximize Video Resolution: Always record in the highest resolution available on your camera or phone (such as 4K, 5.3K, or 6K). Higher resolutions translate directly to greater megapixels, which gives your extracted stills the print quality density of a dedicated camera.
- Increase Shutter Speed to Freeze Motion: Traditional cinematography relies on the 180-degree shutter rule (which uses a slow shutter speed like 1/50s for 24fps video) to introduce smooth, natural motion blur. However, motion blur makes frame extraction unusable. To get sharp stills, break this rule and film with a fast shutter speed (such as 1/250s, 1/500s, or faster). This completely freezes fast moving objects and action.
- Set the Highest Available Bitrate: Compression is the ultimate enemy of video stills. Set your camera's codec to the highest possible bitrate (such as All-Intra or ProRes) to minimize macroblocking and compression noise in your extracted frames.
2. Native Frame Exporting in Professional Editing Suites
Instead of relying on lossy system screenshots, use the uncompressed frame extraction pipelines built directly into industry standard editing platforms:
- DaVinci Resolve: In the Edit or Cut page, find your perfect frame and navigate to File > Export > Export Current Frame. Alternatively, on the Color page, right click the viewer and select "Grab Still". Go to your Gallery tab, right click the saved thumbnail, and export it as an uncompressed TIFF or DPX file.
- Adobe Premiere Pro: In your Program Monitor, navigate to your target frame and click the "Export Frame" camera icon (or press the shortcut Ctrl + Shift + E on Windows / Cmd + Shift + E on Mac). In the settings dialog, choose JPEG, PNG, or DPX, select your destination directory, and export the native resolution file.
3. Post Production Grading and the "Log Profile" Trap
If you extract a frame from professional camera footage, you will often find that the image looks incredibly flat, gray, and lacked contrast. This occurs because professional cameras record using logarithmic color curves (such as Sony S-Log, Canon C-Log, or DJI D-Log) to preserve high dynamic range.
Because video profiles are intentionally flat, you must import your extracted TIFF or PNG frame into a photo editing suite like Adobe Lightroom or Photoshop. Apply a matching LUT (Look Up Table) or manually adjust the exposure, contrast, highlights, and saturation to restore the rich colors and make the frame resemble a finished photograph.
4. Leverage AI Reconstruction to Overcome Frame Softness
Even the most precise native extraction cannot completely bypass the limitations of video compression and optical blur. In our digital workflows, when we encounter low resolution source files or motion artifacts, we pass the extracted image through an AI upscaling engine.
Using an advanced utility like AI Photo Enhancer allows you to clean up compression noise, upscale the base resolution, and intelligently reconstruct lost textures. Whether you are correcting a slightly soft frame from an old archive or preparing an action shot for print design, The Photo Enhancer bridges the gap by transforming raw video frames into highly polished, production grade visual assets.
Summary of Extraction Workflows
| Platform / Use Case | Recommended Tool | Primary Benefit |
|---|---|---|
| Windows 11 PC | Windows Photos App (Three dots menu) | Instant extraction to original folder, zero quality loss |
| Windows 10 PC | Legacy Photos App (Pencil icon) | Simple, native Windows 10 interface |
| macOS | Photos App ("Export Frame") | Clean, native macOS integration, uncompressed TIFF format |
| macOS (Fastest) | QuickTime Player (Command + C) | Immediate clipboard copy with system camera sound |
| VLC Media Player | Built in snapshot tool (Shift + S) | Customisable formats (PNG/JPG/TIFF) and customizable destination directories |
| DaVinci Resolve | Export Current Frame (TIFF/DPX) | Lossless production grade export, ideal for advanced post production |
| Premiere Pro | Export Frame Camera Icon (Ctrl+Shift+E) | Instant high quality frame dump in native project resolution |
| iPhone / iOS | Frame Grabber / HashPhotos App | Bypasses iOS screenshot resolution limits |
| Android | Google Photos ("Export frame") | Built in, fast, and high quality (Pixel, Motorola, Xiaomi) |
| Android (Samsung) | Samsung Gallery (Capture icon) | Seamless native capture saved directly to Gallery |
| YouTube | Double Right Click Method | Captures the native web player resolution |
| YouTube (Frequent) | "Screenshot YouTube" Extension | One click, instant native resolution file downloads |
| CapCut Mobile | "Frame Capture" Home Tool | Native full resolution frame extraction without timeline editing |
| Canva | Split & Download (S Shortcut) | Leverages page splitting to render the exact timeline frame |
| Bulk Processing | FFmpeg Command Line | Perfect for developers and batch extraction |
| Post Extraction | AI Photo Enhancer | Upscales, enhances, and stylizes extracted stills |
By choosing the correct method for your specific device and platform, you can ensure that you never have to settle for blurry, low resolution screenshots again. Whether you are extracting a quick frame on your iPhone or pulling high fidelity source files on your PC, these techniques will preserve every pixel of your video's original quality.